
Why Proper Shingle Roof Installation Steps Matter for Your Home’s Protection
Proper shingle roof installation steps create a layered water management system that protects your home for decades. Correct execution provides a defense against rain, wind, and ice that can help a roof last 20-30 years or more.
Quick Answer: The Essential Shingle Roof Installation Steps
- Prepare the roof deck – Remove old materials, inspect for damage, replace rotted boards
- Install drip edge – Add metal edging along eaves before underlayment
- Apply ice & water barrier – Protect vulnerable areas (eaves, valleys, penetrations)
- Lay underlayment – Install water-resistant barrier across entire deck
- Install drip edge on rakes – Add metal edging along sloped edges over underlayment
- Apply starter shingles – Create foundation along eaves and rakes
- Install field shingles – Work bottom to top, staggering each course properly
- Flash valleys and penetrations – Waterproof all critical junctions
- Cap ridges and hips – Cover peaks with specialized shingles
- Inspect and clean up – Remove debris, check for loose shingles
Why Installation Quality Matters
According to the National Roofing Contractors Association, 60% of roof failures are due to poor installation or materials, not the shingles. Incorrect nailing alone accounts for up to 40% of failures during storms.
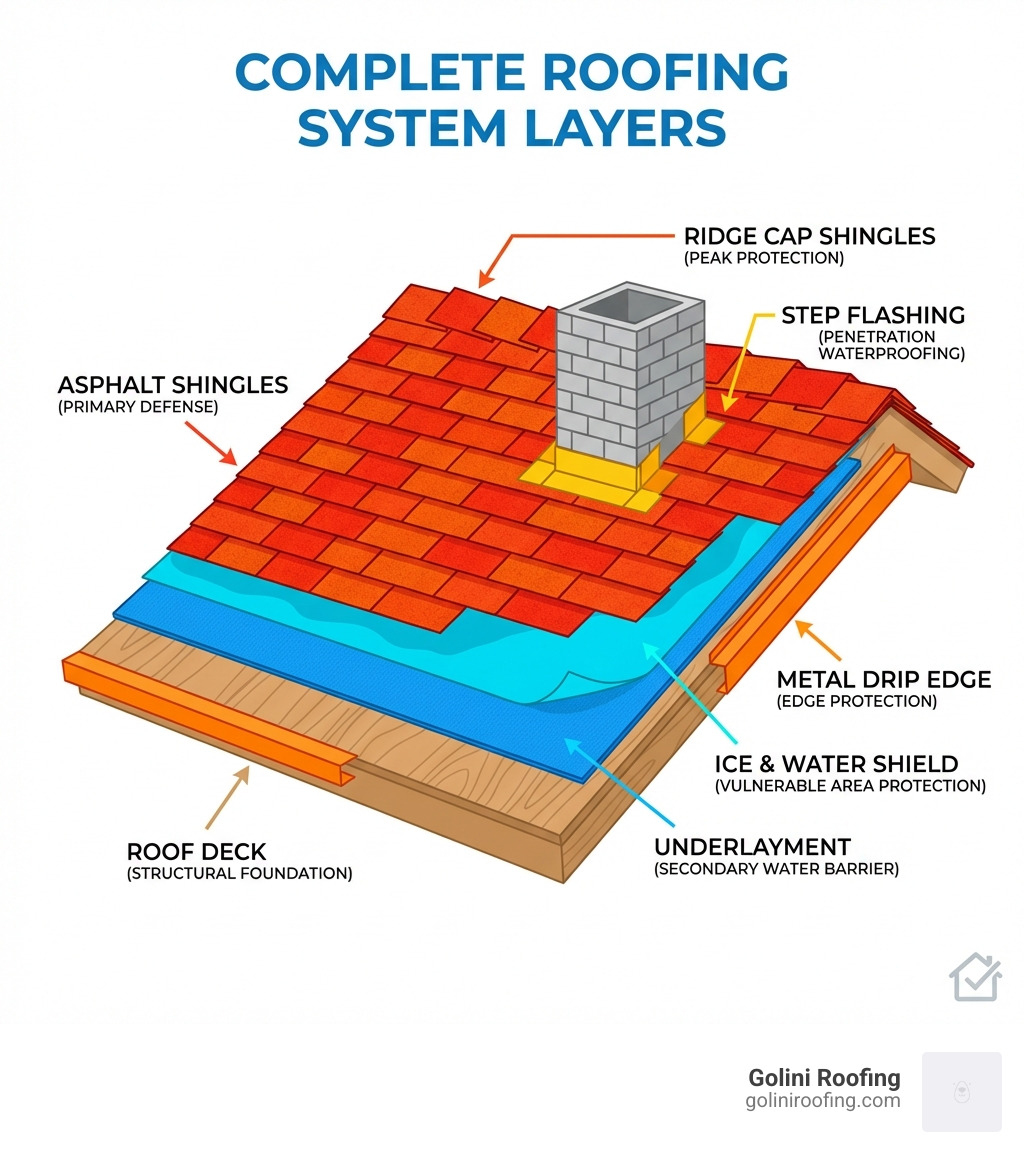
Your roof is a complete system where each layer has a specific purpose:
- Deck – The structural foundation
- Underlayment – Secondary water barrier
- Ice & water barrier – Protection against ice dams and wind-driven rain
- Shingles – Primary weather defense and aesthetic finish
- Flashing – Waterproofing at all transitions and penetrations
- Ventilation – Heat and moisture management
If one component is installed incorrectly, the entire system is vulnerable to leaks and premature failure.
I’m Jack Golini. With over 35 years of experience on the North Shore, I know that precise shingle roof installation steps are the difference between a 15-year roof and a 30-year one. At Golini Roofing, we build complete water management systems, not just cosmetic upgrades.
Gearing Up: Essential Materials and Roof Preparation
Proper preparation is key to a successful roofing project. Gathering the right tools and materials ensures the final result is durable and high-quality.

Essential Preparation for the Shingle Roof Installation Steps
Here’s what we use to ensure precision and durability in our shingle roof installation steps.
Essential Tools:
- Roofing nail gun or hammer (we prefer hand-nailing for quality)
- Utility knife with hook blades
- Tape measure and chalk line
- Pry bar and shingle remover
- Tin snips for cutting flashing
- Caulking gun
- Hand roller for leak barrier adhesion
- Magnetic sweeper for cleanup
- Ladders and scaffolding
- Hoist or ladder lift
Essential Materials:
- Asphalt shingles (field, starter, hip and ridge caps)
- Roofing nails (galvanized, 11- or 12-gauge with 3/8″ head, long enough to penetrate sheathing by 3/4″)
- Underlayment (synthetic or felt)
- Ice and water barrier (self-adhering membrane)
- Drip edge (metal flashing)
- Flashing materials (metal for valleys, step flashing, pipe boots)
- Roofing cement
- Sealant
Safety First:
Safety is our top priority. We always use:
- Fall protection kits (harnesses, ropes, anchors)
- Rubber-soled shoes
- Knee pads
- Hard hats
- Eye protection and gloves
Before new materials go down, we prepare the roof deck:
- Tear off old materials: We recommend a full tear-off for a thorough deck inspection, proper adhesion, and to avoid voiding warranties. This includes removing all old shingles, nails, and flashing.
- Inspect the roof deck: We check the exposed deck for water damage or rot. Damaged boards are replaced with new sheathing (minimum 3/8″ plywood or 7/16″ OSB).
- Ensure a clean surface: The deck must be smooth, dry, and free of debris for a stable foundation.
Calculating Shingle Quantity:
We calculate the roof’s total area in square feet and divide by 100 to determine the number of “squares” needed. We add 10-20% for waste and cuts, more for complex roofs.
Choosing the Right Asphalt Shingles
Asphalt shingles are popular for their versatility and cost-effectiveness. When selecting shingles in Massachusetts, you’ll find two main types:
| Shingle Type | Description | Pros | Cons | Lifespan | Cost (per sq ft)* |
|---|---|---|---|---|---|
| 3-Tab Shingles | Flat, single-layer shingles with cutouts creating a three-tab look. | Economical, lightweight, simple aesthetic. | Shorter lifespan, less wind resistance, flatter appearance. | 15-20 years | $2.50 – $4.00 |
| Architectural Shingles | Multi-layered, laminated shingles for a thicker, dimensional look. | More durable, better wind resistance, longer lifespan, and improved aesthetics. Better warranties are common. Options include impact-resistant shingles for hail and wind protection. | Usually 20% pricier than 3-tab, heavier, requires more robust roof deck. | 25-35+ years | $4.00 – $8.00 |
*Please note: These are average costs based on internet data and not actual costs for Golini Roofing. Pricing can vary significantly based on material quality, roof complexity, and specific project requirements.
For the Massachusetts climate, with its hot summers and snowy winters, shingles must handle temperature swings. High-quality architectural shingles with good wind resistance are a wise investment for durability. In severe weather areas, consider impact-resistant or hurricane-rated options for superior protection.
The Core Shingle Roof Installation Steps: From Deck to Peak
With the deck prepped, we begin building the roof from the bottom up, creating a layered system to shed water and protect your home.
Step 1: Installing Drip Edge and Ice & Water Shield
The first layers are critical for preventing water intrusion at the roof’s vulnerable edges.
Drip Edge:
Drip edge is metal flashing installed at roof edges to guide water into gutters, protecting the fascia and deck. It also provides a clean finish.
- Eave Installation: We install drip edge along the eaves (bottom edges) before the underlayment. This ensures water runs over the drip edge and into the gutter.
- Rake Installation: Along the rakes (sloped edges), drip edge goes on top of the underlayment to provide a clean edge and improve wind resistance.
- Building Code Requirement: Drip edge is required along eave and rake edges by the International Building Code (Section R905.2.8.5), and we always comply with local Massachusetts codes.
Ice and Water Barrier (Leak Barrier):
This self-adhering membrane protects against leaks from ice dams and wind-driven rain. It’s essential for Massachusetts winters.
- Purpose: It creates a waterproof seal, and its rubberized asphalt coating seals around fasteners for extra protection.
- Installation in Vulnerable Areas: We install it along eaves, in valleys, and around penetrations like chimneys, vents, and skylights.
- Eave Installation: The barrier must extend up the roof at least 24 inches inside the interior wall line to protect against ice dams. We align it over the drip edge and use a hand roller to ensure a smooth, bubble-free adhesion.
- Valleys and Penetrations: We install additional bands of leak protection in valleys and around all penetrations.
Step 2: Laying the Underlayment
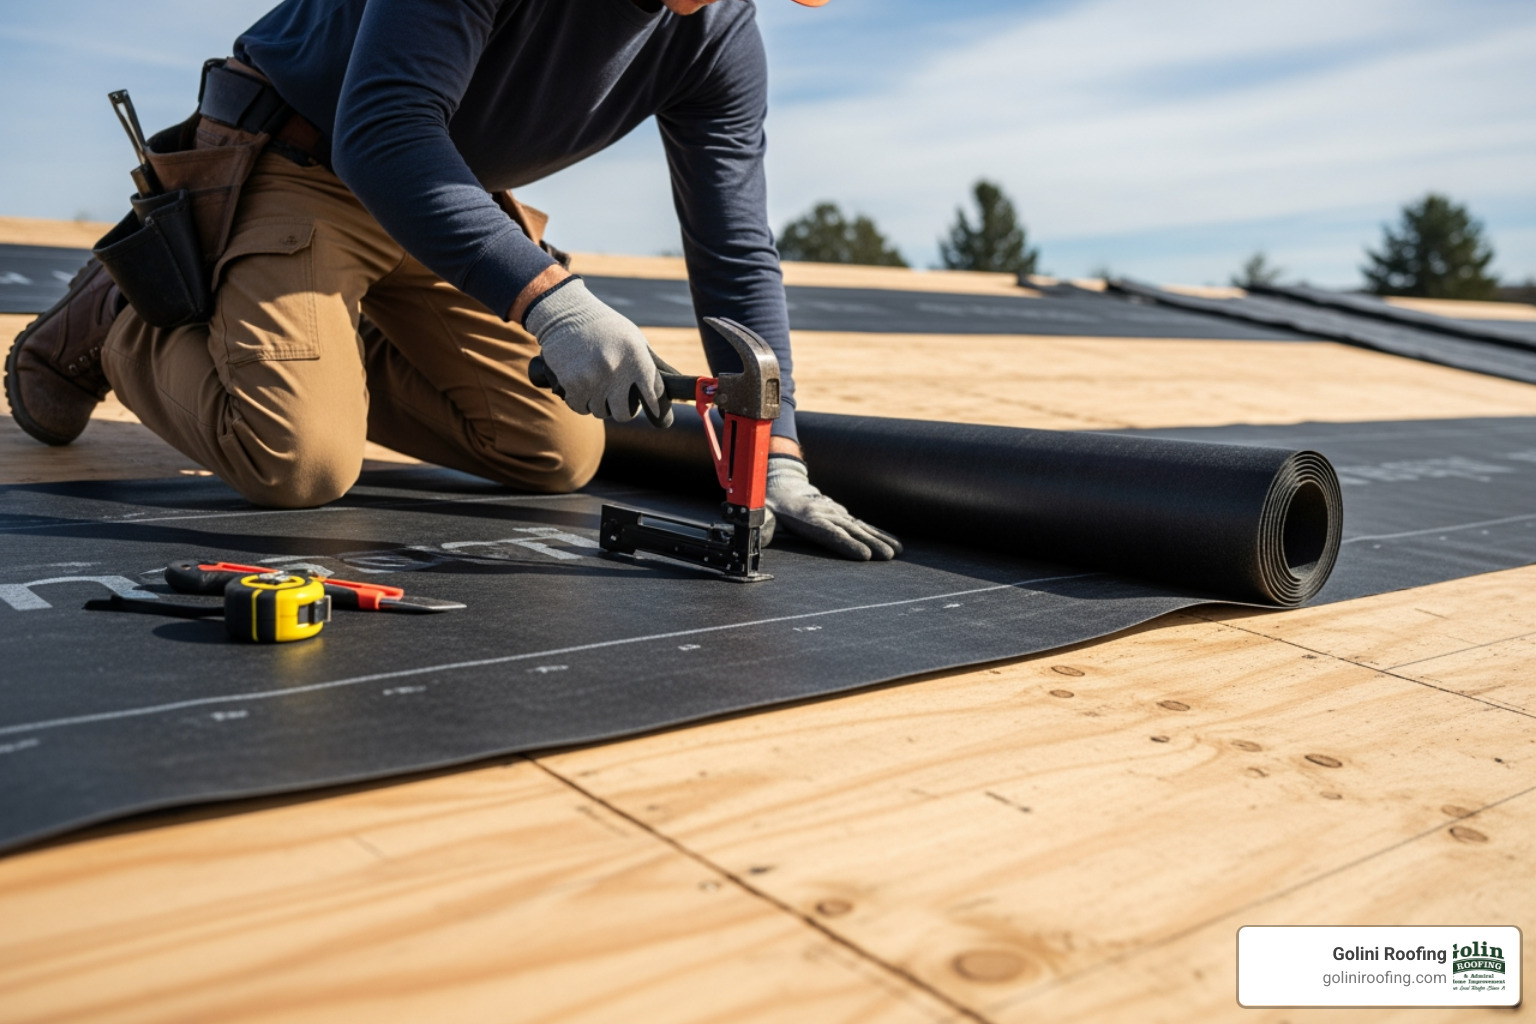
Next, the rest of the roof deck is covered with underlayment, a secondary water barrier between the deck and shingles.
- Purpose: Underlayment guards against wind-driven rain that gets beneath shingles. It also protects the deck during installation.
- Types: We use either asphalt-saturated felt or synthetic underlayments. The Asphalt Roofing Manufacturers Association recommends synthetic underlayments for their high tear strength. Synthetics are lighter, more durable, and resist wrinkles.
- Installation: We roll out the underlayment horizontally from the eaves up, overlapping each course by at least 2 inches and staggering side laps. We secure it with cap nails or staples.
Proper underlayment helps water flow into your gutters, which we can also maintain with our gutter services.
Step 3: Installing Starter Shingles
Starter shingles are the first course laid at the eaves and rakes, providing a critical foundation.
- Purpose: They ensure a straight edge and have a continuous sealant bead that bonds to the first course of main shingles, preventing wind uplift and water infiltration.
- Installation: We position the starter strip to overhang the drip edge by about half an inch. Along rakes, they help create a straight edge and improve wind resistance.
Step 4: Laying and Staggering the Field Shingles
Correctly installing field shingles is crucial for both aesthetics and performance.
- Chalk Lines: We snap chalk lines to guide the alignment of each shingle row, ensuring straight courses.
- Staggering Patterns: We stagger shingle joints by at least 6 inches from row to row. This prevents water from penetrating vertical seams and strengthens the roof against wind. We work from the bottom up, overlapping each shingle correctly.
Step 5: Finishing with Hip and Ridge Caps
After the field shingles, we finish the hips and ridges (peaks and angles) with specialized cap shingles.
- Purpose: Hip and ridge caps provide a finished look and protect the peaks where two roof planes meet.
- Installation: We apply these shingles from the bottom of a hip or one end of a ridge, working up against the prevailing wind. We use longer nails to penetrate through the cap and underlying shingles into the deck. The final cap is sealed with asphalt roof cement for a watertight finish.
See examples of our finished work in our past projects.
Mastering the Details: Flashing, Nailing, and Valleys
Proper flashing, nailing, and valley construction are critical for a leak-free, long-lasting roof. These are common failure points if not handled correctly.
Waterproofing Valleys, Vents, and Chimneys
Leaks often occur where the shingle layer is penetrated or meets a wall. These areas require flashing, an extra layer of water-shedding material.
- Valleys: As a vulnerable area, valleys can be open or closed. We often recommend open metal valleys for longevity, lining the area with corrosion-resistant metal (minimum 24″ wide). In all valleys, we install a self-adhering ice and water barrier underneath for added protection.
- Flashing Around Penetrations: We integrate flashing with the shingle installation:
- Vent Pipes: Metal pipe boots are installed around vents. Shingles are cut to fit, with lower shingles under the flashing and upper shingles over it. Exposed nail heads are sealed with roofing cement.
- Chimneys: These require a full flashing system: apron flashing (front), step flashing (sides), and a cricket or saddle (behind). Counter flashing is installed into the mortar to cover the base flashing.
- Skylights: Similar to chimneys, skylights need a system of base and step flashing for a watertight seal.
- Step Flashing: Where a roof meets a vertical wall, we use metal step flashing integrated with each shingle course. Each piece overlaps the one below, creating a layered defense against water intrusion.
For more on flashing, you can watch a how-to video on YouTube. If you have leaks, our team provides expert roof repairs to restore your roof’s integrity.
Nailing and Fastening: A Critical Part of the Shingle Roof Installation Steps
Incorrect nail placement causes up to 40% of roof failures, according to the NRCA. This is why meticulous nailing is a cornerstone of our shingle roof installation steps.
- Hand-Nailing Precision: At Golini Roofing, we carefully hand-nail each shingle. Unlike nail guns, hand-nailing allows our roofers to ensure each nail is driven perfectly flush, preventing damage and protecting the warranty.
- Number of Nails: We typically use four nails per shingle, but six nails in high-wind areas or for architectural shingles. We often use six nails per shingle in Massachusetts to handle severe weather.
- Nail Placement: Nails must be placed correctly, just below the adhesive strip. They must be driven straight and flush with the shingle surface—not overdriven (tearing the shingle) or underdriven (preventing a proper seal). Some shingles, like those from Malarkey, feature an enlarged nailing area like “The Zone®” to aid correct placement.
- Warranty Compliance: Following the manufacturer’s nailing instructions is critical for performance and warranty compliance.
Common Mistakes to Avoid
Even small oversights can cause major problems. Here are common pitfalls:
- Improper Nailing: Incorrect nail placement is a leading cause of failure, compromising water and wind resistance.
- Poor Flashing: Incorrectly installed flashing in vulnerable spots almost guarantees leaks.
- Incorrect Staggering: Failing to offset shingle joints creates weak points for water to enter.
- Inadequate Deck Preparation: Installing over a damaged or uneven deck compromises the entire system.
- Ignoring Manufacturer Instructions: Deviating from manufacturer guidelines can void warranties and cause performance issues.
- Installing Over Existing Laminate Shingles: Roofing over existing architectural shingles creates an uneven surface that prevents proper sealing and is not recommended. A full tear-off is always best.
The Final Verdict: Professional vs. DIY and Project Cleanup
Choosing between a DIY or professional roofing project involves weighing cost against quality, safety, and long-term value.
Professional vs. DIY: Key Considerations for Warranty and Quality
A DIY roof installation can save on labor costs, but it’s a complex, risky job. Here’s how it compares to hiring a professional.
| Feature | DIY Installation | Professional Installation (Golini Roofing) |
|---|---|---|
| Cost Savings | Lower upfront cost by avoiding labor fees. | Higher upfront cost, but prevents expensive repairs from improper installation, saving money long-term. |
| Expertise & Quality | Requires extensive research and skill. Mistakes can cause leaks and premature failure. | Professionals offer expertise, specialized tools, and experience. We guarantee high-quality installation, follow best practices like hand-nailing, and avoid common errors. |
| Safety | High risk of falls and injury. Requires proper safety equipment and knowledge. | Trained and insured professionals use proper safety gear, minimizing risk and protecting you from liability. |
| Warranty | Can void manufacturer warranties if installation doesn’t follow guidelines precisely. | Professional installation by certified contractors validates manufacturer warranties. We ensure full compliance. |
| Time Commitment | Can take weeks or months for an average home. | A professional crew can typically finish an average-sized home in 1-2 days. |
| Long-Term Value | A poorly installed roof may need early repairs or replacement, negating initial savings. | A professionally installed roof protects your home for 20-30+ years and improves resale value. Our hand-nailing contributes to a durable finish. |
| Insurance | Some insurers may have issues with DIY roof replacements, potentially affecting coverage. | Reputable contractors carry liability and worker’s compensation insurance, protecting the homeowner. |
The National Roofing Contractors Association reports that 60% of roof failures stem from poor installation. This highlights the value of professional expertise. For homeowners in Burlington, Lynnfield, North Reading, Reading, Stoneham, Wakefield, Wilmington, Winchester, and Woburn, MA, choosing a trusted local pro like us ensures your investment is protected. Learn more about our company and our commitment to quality.
The Final Cleanup and Inspection
After installation, a thorough cleanup and final inspection are essential.
- Debris Removal: We remove all old materials, scraps, and packaging from your property, using a dumpster to contain waste.
- Magnetic Sweepers: We use magnetic sweepers to clear your property of stray nails, ensuring safety for tires, pets, and family.
- Protecting Landscaping: We protect landscaping with tarps and plywood before work begins, which simplifies the final cleanup.
- Final Roof Inspection: We conduct a final inspection to check for:
- Loose shingles or missed nails.
- Proper shingle alignment and staggering.
- Securely sealed flashing.
- Correctly installed hip and ridge caps.
- Overall appearance and quality.
After installation, shingles need time to seal with heat and sunlight. We advise avoiding walking on your new roof for at least two weeks to allow this process to complete undisturbed.
Frequently Asked Questions about Shingle Installation
Here are common questions homeowners ask about shingle roof installation steps:
Can you install new shingles over an old layer?
While some codes allow it, we don’t recommend installing new shingles over an old layer. Here’s why:
- Hidden Damage: A tear-off is the only way to inspect the roof deck for rot or damage.
- Added Weight: Multiple shingle layers add significant weight that can stress your home’s structure.
- Voided Warranties: Many manufacturers void warranties if shingles are installed over an existing layer.
- Adhesion Issues: An uneven surface prevents new shingles from sealing properly, making them vulnerable to wind.
- Poor Aesthetics: An overlay often results in a lumpy, less attractive finish.
For best performance and to maintain your warranty, we always recommend a complete tear-off.
What are the best weather conditions for installing shingles?
The best weather for shingle installation is dry and moderate.
- Temperature: The ideal range is 45°F to 85°F.
- Rain and Wind: Installation should be avoided during rain or high winds. Rain traps moisture, while wind makes work unsafe and can blow off unsealed shingles.
- Cold Weather: Below 45°F, shingles become brittle and can crack. The adhesive also won’t seal properly, leaving the roof vulnerable to wind.
- Hot Weather: Above 85°F, shingles can become too soft and scuff easily. The adhesive can also activate too quickly, causing bonding before proper alignment.
How long does it take for new shingles to seal?
Shingle adhesive strips need heat and sun to bond and create a wind-resistant seal. This is called thermal activation.
- Activation Time: Sealing can take hours on a warm, sunny day, or weeks in cooler, overcast weather. It depends on climate, temperature, and sun exposure.
- Avoid Walking: It is crucial to avoid walking on a new roof for at least two weeks. This can break the adhesive bond before it fully cures, leaving shingles vulnerable to wind.
- Hand-Sealing: In cold or windy conditions, manufacturers may recommend hand-sealing, which involves applying dabs of roof cement under each shingle tab to ensure a bond.
Conclusion
Your roof is a complete system where each of the shingle roof installation steps is vital. From deck prep to nailing and flashing, every detail ensures a durable, watertight finish. Quality installation is the key difference between a 15-year roof and a 30-year roof.
At Golini Roofing, with over 35 years of experience serving communities like Wakefield, MA, and the entire North Shore, we pride ourselves on our meticulous technique, including our commitment to hand-nailing each shingle. We understand that your home is your biggest investment, and we build roofs to protect it for decades to come.
For a durable, hand-nailed roof that stands the test of time, learn more about our expert roof installation process and find the Golini Roofing difference.
