Nail It Down: The Complete Roof Installation Process Explained
The roof installation process on an existing house is really a roof replacement: the old roof comes off, the wood underneath is checked and repaired, and a new roof system goes on in a set order. At Golini Roofing, which has worked out of Wakefield since 1982, that order is the same on every job: look at the roof and write the estimate, protect the property, tear off to the deck, repair the deck, put down ice shields and underlayment, replace the flashing, make sure the attic can vent, hand-nail the shingles, then finish the ridge and clean up.
Below is what happens at each step, why the order matters on a New England roof, and what to ask so you know the job was done right.
Before anything comes off: the look and the written estimate
A good installation starts on the ground and in the attic, before a single shingle is pulled. When we come out, we check the places where roof problems usually start: the shingles themselves, the valleys, the flashing at chimneys and skylights, the vents and the roof edge. If we can get into the attic, we look there too, because stains on the underside of the deck and frost or damp insulation tell you things the outside of the roof can't.
From that visit you get a free, no-obligation written estimate. It should explain what is driving the price and whether we recommend tearing off the old roof. If the roof has a few years left and only needs a repair, we'll say so. If you're still deciding whether the timing is right, our roof replacement readiness checklist covers what to sort out before the crew arrives.
Step 1: Protecting the property and tearing off to the deck
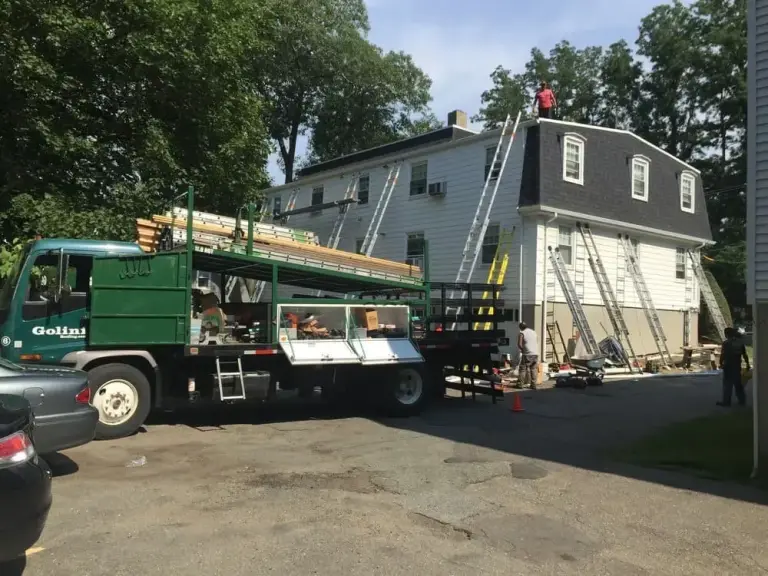
Siding, shrubs and walkways get covered before anything comes off. Then the old roof is removed down to the wooden deck (the sheets of plywood or boards the roof is nailed to).
We usually do a full tear-off on replacements because laying new shingles over old ones hides the deck, the old flashing and the ventilation. There is also a code reason. The Massachusetts Residential Code (10th edition, based on the 2021 International Residential Code) defines a roof replacement as removing the existing layers down to the roof deck, and it does not allow a new layer to be laid over a roof that already has two or more layers of covering, or over one that is too deteriorated or water-soaked to serve as a base (Massachusetts Residential Code, Chapter 9, sections R908.3 and R908.3.1.1). Plenty of older North Shore houses already have two layers, so on those a tear-off is the only legal option anyway.
Step 2: Checking and repairing the deck
With the deck bare, rot and soft spots are easy to see. They tend to show up along the eaves where ice dams have backed water up, around old chimney flashing, and under valleys. Damaged wood is cut out and replaced before anything new goes on, because new shingles nailed into soft wood won't hold.
Nobody can see the full condition of the deck until the old roof is off, so this is the one part of the job that can change after work starts. Your estimate should say how deck repair will be handled and priced. Our post on roof decking change orders lists the questions worth asking before you sign.
Step 3: Drip edge, ice shields and underlayment
Once the deck is solid, the layers that keep water out go down in order:
- Drip edge along the eaves and rakes, so water runs off the edge instead of curling back under onto the fascia.
- Ice shield (a self-adhering waterproof membrane) at the eaves and in the valleys. This is the layer that stops water from an ice dam from getting into the house.
- Underlayment over the rest of the deck, as a second line of defense under the shingles.
The ice shield is not optional in a climate like ours. Where ice forming along the eaves is a known problem, the code requires an ice barrier running from the lowest roof edge to a point at least 24 inches inside the exterior wall line, and on roofs with a slope of 8 in 12 or steeper it must also reach at least 36 inches up the slope from the eave (Massachusetts Residential Code, R905.1.2). Wakefield, Reading and Stoneham see the freeze and thaw cycles that build ice dams every winter, so this is a detail worth confirming on any estimate.
Step 4: New flashing at chimneys, skylights, walls and valleys
Most roof leaks start at the joints, not in the middle of the shingles. Flashing is the metal that seals those joints where the roof meets a chimney, a skylight, a wall or another roof plane. On our replacements, worn flashing at chimneys, skylights, walls and valleys is replaced rather than reused, because old flashing bent back into place under new shingles is a common source of leaks a year or two later.
Houses with a lot of roof lines, like the Victorians and mansard multifamilies found all over the North Shore, have many more of these joints, and each one takes its own careful work. More on this on our skylights, flashing and venting page.
Step 5: Making sure the attic can breathe
An attic needs air coming in low (usually at the soffits) and going out high (at the ridge or roof vents). When it can't vent, it holds heat and moisture. That ages new shingles faster, and in winter the warm attic melts snow on the roof, which refreezes at the cold eaves and builds ice dams.
A replacement is the easiest time to fix ventilation, because the deck is open. We look at what the attic has, what it's missing and whether any vents are blocked. If you want to raise this with any roofer, our list of ventilation questions for a replacement estimate is a good place to start.
Step 6: Shingles, every one nailed by hand
Shingles go on from the eaves up, starting with a starter course along the edge, with each row overlapping the one below so water always runs over a joint, never into it. Where the nail goes and how deep it sits matters as much as the shingle itself.
Golini hand-nails every shingle. A nail gun adds speed, but an overdriven or crooked nail leaves a shingle that can't seal down or grip in high wind, and you won't see it on a new roof until the first nor'easter. When each nail goes in by hand, the roofer feels it seat, so none get missed. Valleys, dormers, turrets and steep pitches get the same care as the open field of the roof.
Weather plays a part here too. Most asphalt shingles have a heat-activated sealant strip that bonds each course to the one below once the sun warms the roof. The Asphalt Roofing Manufacturers Association notes that sealing time depends on the slope, the direction the roof faces and how much sun it gets, that shingles become less flexible as it gets colder, and that shingles can be hand-sealed with an approved roofing cement for extra wind resistance in very cold weather (ARMA, cold weather installation recommendations).
Step 7: Ridge, final check and cleanup
The ridge is capped last, along with any ridge vent. Then the roof gets a final look: flashing seated, vents open, edges finished.
Cleanup is part of the job, not an afterthought. Before we leave, we sweep the yard and driveway with magnetic rollers so no nails are left in the grass or under your tires. If you want to know what to expect on the ground during the job, see our roof replacement cleanup questions.
How the order fits together
Each step depends on the one before it. Shingles are only as good as the deck they're nailed to, the ice shield only works if it covers the right part of the eave, and new shingles over old flashing still leak. That's why skipping or reordering steps to save a day tends to cost more later.
It's also why we work one job at a time. Our crew starts your roof and stays on it until it's finished, so the work isn't split between your house and someone else's. Every Golini replacement follows this same order; you can read more about it on our roof replacement page.
Common questions about the roof installation process
Is roof installation the same as roof replacement?
On an existing house, yes. Installing a new roof means removing the old one first, repairing the deck, then building the new roof up layer by layer. A brand-new roof on new construction skips the tear-off but follows the same order from the deck up.
Can new shingles go over my old roof?
Sometimes, but not if the roof already has two or more layers or the old roof is too deteriorated to act as a base; Massachusetts code doesn't allow it in those cases. Even when it's allowed, a layover hides the deck, flashing and ventilation, which is why we usually tear off.
How long does the installation take?
It depends on the size and shape of the roof, how many layers come off and what the deck looks like underneath. We give you a timeline with your estimate; our post on how many days a roof replacement takes explains what moves that number.
What happens if the deck is rotted?
We replace the damaged wood before the new roof goes on rather than covering it up. Your estimate should explain how that repair is handled if it turns up.
Are your shingles really nailed by hand?
Yes. Every shingle on every Golini roof is nailed by hand, including on steep, cut-up roofs like mansards and turrets.
If your roof is due, or you're not sure whether it is, request a free estimate or call (781) 246-0141. We'll look at the roof in person, tell you plainly what it needs and put a written price in your hands.