Is Your Roof Hiding a Leak? Here’s How to Find Out Fast
Roof inspection for leaks is one of the most important things you can do to protect your home. Here’s a quick overview of what to look for and where:
Quick Answer: How to Inspect Your Roof for Leaks
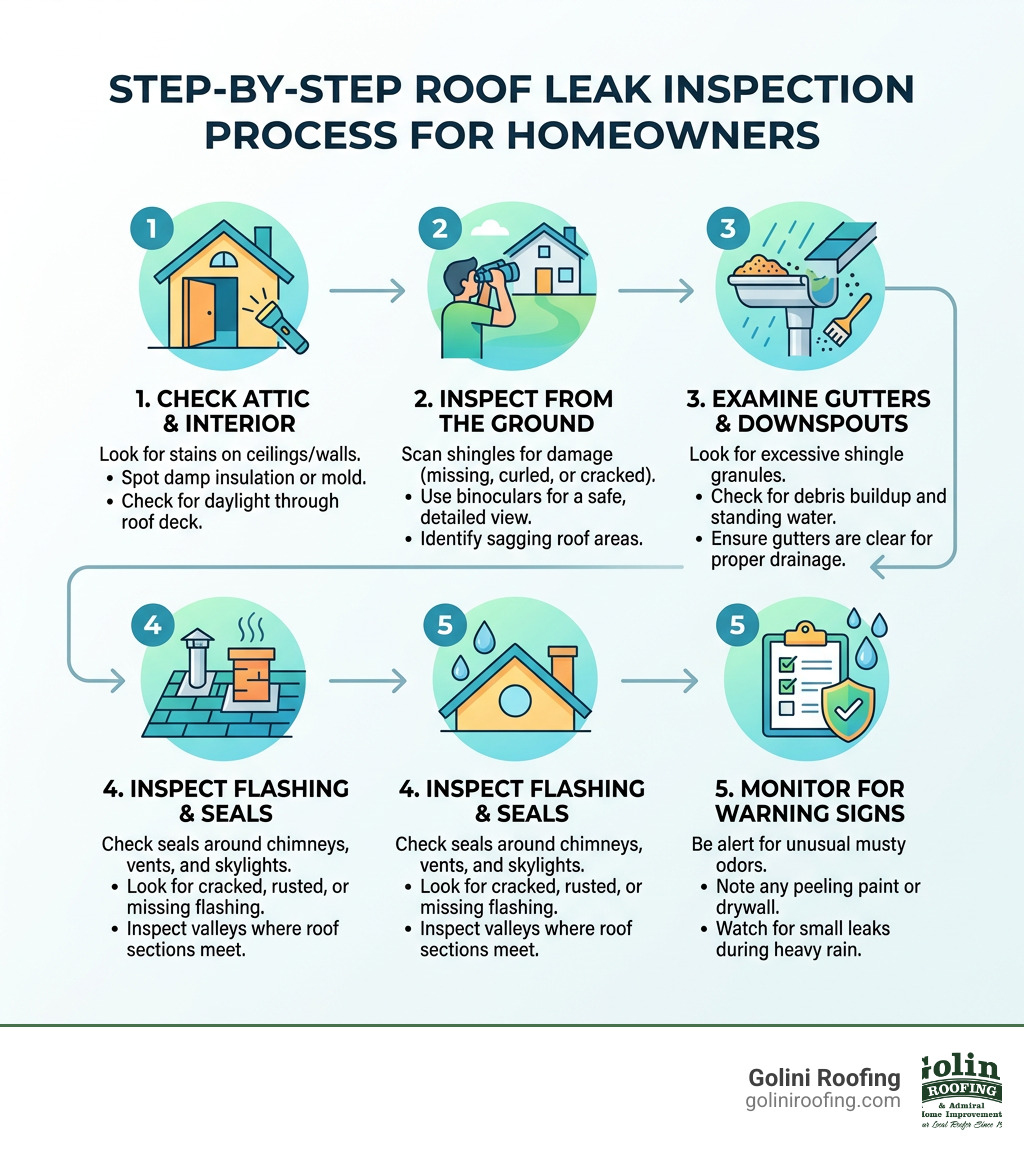
- Check the attic first – Look for water stains, damp insulation, mold, or daylight coming through the roof deck
- Inspect from the ground – Use binoculars to spot missing, curling, or damaged shingles and sagging areas
- Check the gutters – Look for shingle granules, which signal aging or deteriorating shingles
- Examine flashing and seals – Around chimneys, vents, and skylights are the most common leak entry points
- Look for interior warning signs – Water stains on ceilings or walls, peeling paint, and musty odors
Around 40% of all building-related problems trace back to water intrusion — and your roof is the most likely entry point. Even a small, slow leak can quietly cause mold growth, rot your framing, and drive up energy bills before you ever notice a drip.
The good news? Catching problems early is straightforward when you know what to look for.
I’m Jack Golini, owner of Golini Roofing in Wakefield, MA, and I’ve been performing roof inspection for leaks and delivering quality roofing craftsmanship across Massachusetts’s North Shore since 1982. In this guide, I’ll walk you through exactly what we look for — so you can catch problems before they become costly repairs.
Quick look at roof inspection for leaks:
Why a Regular Roof Inspection for Leaks is Critical
It is easy to ignore your roof when the sun is shining, but your roof is a “ticking time bomb” if a small leak is left unaddressed. We often tell our neighbors in Wakefield and Reading that water is a patient enemy; it doesn’t need a massive hole to cause a disaster. A tiny crack in a shingle or a loose piece of flashing is all it takes for moisture to begin its slow march into your home.
Statistics show that roughly 40% of all building-related woes are traced back to water intrusion, primarily through the roof. When water gets in, it doesn’t just stay on the surface. it saturates your attic insulation, ruins your drywall, and creates a breeding ground for mold. According to The Complete Professional Roof Inspection Guide, catching these issues early can save you thousands in structural repairs.
Regularly performing a roof inspection for leaks ensures that you aren’t caught off guard by a sudden “waterfall” in your living room during a Nor’easter. Beyond just stopping drips, an inspection maintains your home’s energy efficiency. Wet insulation loses its R-value, meaning your heater has to work overtime in the winter to keep your house warm.
The Hidden Dangers of Ignoring Roof Damage
If you find yourself asking, “do i need a roof inspection,” the answer is almost always yes if you haven’t had one in the last year. Ignoring a leak leads to a “mold menagerie” that can cause respiratory issues and unpleasant odors.
Furthermore, prolonged moisture leads to wood decay. Your roof’s structural integrity relies on rafters and decking staying dry. Once rot sets in, the wood weakens, which can lead to sagging rooflines or even a partial collapse under heavy snow loads—a common concern for those of us in Stoneham and Woburn. Electrical hazards are another major risk; water traveling along rafters can find its way into light fixtures and junction boxes, creating a fire hazard.
The Homeowner’s DIY Roof Inspection Checklist

Safety is our top priority. We never recommend that a homeowner walks on a steep or wet roof. You can actually perform a very effective roof inspection for leaks with your feet firmly planted on the ground.
Before you start, wait for a clear, dry day. You’ll need a few basic tools:
- A pair of high-quality binoculars
- A powerful flashlight
- A notepad or smartphone for photos
- A sturdy ladder (only if you are comfortable checking the gutters or accessing the attic)
If you are looking for an attic inspection near me, you can do the first pass yourself. Start inside and work your way out.
Interior Signs: Performing a Roof Inspection for Leaks in the Attic
The attic is the “crime scene” where you’ll find the most evidence of a leak. Grab your flashlight and head upstairs during the day.
- Look for “Dark Trails”: Water often travels along rafters or beams before it drips. Look for brownish or yellowish stains on the wood.
- Check for “Sky Lights”: If you see pinpoints of daylight coming through the roof boards (sheathing), you have a direct path for water to enter.
- The “Sniff Test”: A musty, damp smell is a dead giveaway that moisture is trapped somewhere.
- Insulation Watch: Check for matted, damp, or moldy insulation. If the insulation is compressed, it has likely been wet recently.
- Peeling Paint: On the floor below the attic, look for bubbling or peeling paint on the ceiling. This is often caused by water pooling behind the latex paint.
According to industry experts in their guide on How to Detect and Address a Roof Leak, water stains in the attic near roofing structures almost always point to a roof issue rather than a plumbing leak.
Exterior Signs: A Ground-Level Roof Inspection for Leaks
Now, step outside with your binoculars. Walk around the perimeter of your home and look for these red flags:
- Shingle Condition: Look for shingles that are missing, cracked, or curling at the edges. If they look “bald,” they have lost their protective granules.
- Sagging Areas: If the roofline looks uneven or has “dips,” it could indicate rotting roof deck boards underneath.
- Gutter Debris: Check your downspouts for a buildup of shingle granules. They look like coarse sand. Excessive granule loss means your shingles are reaching the end of their lifespan.
- Fascia and Soffit Damage: Look for rot or water stains on the boards right under the roof edge.
A routine roof inspection from the ground can catch about 70% of obvious issues before they become emergencies.
Common Causes and Locations of Roof Leaks
Understanding why roofs fail helps you know where to look. Most leaks aren’t caused by a “hole” in the middle of a shingle; they happen where the roof is interrupted by a chimney, a vent, or a wall.
| Issue | Cause | Sign to Look For |
|---|---|---|
| Shingle Wear | Aging / UV Exposure | Curling, cracking, or missing pieces. |
| Flashing Failure | Expansion/Contraction | Gaps or rust around the chimney or vents. |
| Clogged Gutters | Poor Maintenance | Water backing up under the shingles. |
| Storm Damage | Wind or Hail | Lifted shingles or impact “bruises.” |
| Ice Dams | Poor Ventilation | Large icicles and water stains near the eaves. |
Aging is the number one culprit. Asphalt shingles have a finite lifespan, and as they age, they become brittle. When the temperature fluctuates in Massachusetts, these brittle shingles crack. For a deeper dive, see 5 Steps for Roof Leak Cause Determination.
Vulnerable Areas: Flashing, Valleys, and Penetrations
If you were a detective investigating a roof inspection for leaks, these would be your “usual suspects”:
- Flashing: These are the metal bits that seal the “seams” of your roof. They are found around chimneys, dormers, and where the roof meets a wall. If the sealant has cracked or the metal has rusted, water will get in.
- Vent Boots: The rubber seals around the pipes sticking out of your roof can dry out and crack in the sun, creating a direct leak into your bathroom or kitchen.
- Valleys: These are the “V” shaped channels where two roof slopes meet. They carry a high volume of water, and if they weren’t installed correctly, they are prone to leaking.
- Ice Dams: In places like Lynnfield and Winchester, ice dams are a major headache. When snow melts and refreezes at the cold edge of the roof, it creates a dam that forces water back up under the shingles.
If you’ve recently had a storm, you might want to check for hail damage roof inspection markers, such as small pockmarks in the shingles or dented metal vents.
When to Call a Professional for a Roof Inspection for Leaks
While a DIY check is great for maintenance, there are times when you need the “cavalry.” If your roof is steep, if you suspect a leak but can’t find it, or if you’ve seen water stains on your ceiling, it’s time to call in the pros.
Professional roofing inspector teams have tools that the average homeowner doesn’t. We use thermal imaging cameras to “see” moisture trapped behind walls and moisture meters to determine exactly how saturated your roof deck is.
Safety is the biggest reason to hire a pro. Climbing ladders and walking on roofs is dangerous work. We have the fall-arrest gear and the experience to navigate heights safely. At Golini Roofing, we provide professional roof inspections that go far beyond a simple visual check.
What to Expect from a Certified Roof Assessment
When we arrive at your home in North Reading or Wilmington, we don’t just “glance” at the shingles. A comprehensive inspection takes between 1 to 3 hours, depending on the size of your home. You can find more details on how long does a roof inspection take here.
You should expect:
- A Detailed Report: A written document outlining the condition of your shingles, flashing, gutters, and ventilation.
- Photo Documentation: We take pictures of the problem areas so you can see exactly what we see without having to climb a ladder yourself.
- Repair Prioritization: We won’t just tell you that you need a new roof; we’ll tell you what needs fixing now and what can wait.
- Pricing Estimates: Based on general internet data, a professional roof inspection can range anywhere from $150 to over $600 for very complex structures. (Note: These are average costs from online sources and not the specific rates for Golini Roofing).
Seasonal Maintenance to Prevent Future Leaks
The best way to handle a leak is to prevent it from ever happening. In Massachusetts, our weather is tough on roofs. Between the summer humidity and the winter freezes, your roof needs a little TLC.
- Clean the Gutters: Do this at least twice a year—once in the spring and once in the late fall. Clogged gutters are a leading cause of roof rot and ice dams.
- Trim the Trees: Overhanging branches can rub against shingles like sandpaper, stripping away the protective granules. They also give squirrels and raccoons an “expressway” to your roof.
- Check the Ventilation: A hot attic in the summer can literally “cook” your shingles from the inside out, causing them to curl. Ensure your soffit and ridge vents are clear of debris.
If you are worried about the cost, many reputable local contractors offer a free roofing inspection to help you get started on a maintenance plan.
Regional Considerations for Massachusetts Homeowners
Living in the Wakefield, MA area means we face specific challenges.
- Ice Dams: Our freeze-thaw cycles are brutal. Proper attic insulation and ventilation are the only ways to prevent ice dams from forming.
- High Humidity: Our summers can be very humid, which promotes the growth of moss and algae. Moss acts like a sponge, holding moisture against your shingles and eventually lifting them up.
- Heavy Snow: After a major storm, it’s worth checking your attic for “snow blow-in” through vents. You can read our guide on storms over now what a guide to post storm roof inspections for more tips.
Frequently Asked Questions about Roof Inspection for Leaks
How often should I inspect my roof for leaks?
Industry experts recommend an inspection at least twice a year—ideally in the spring and fall. You should also do a quick check after any major weather event, like a hailstorm or high-wind event. If you’re wondering “are roof inspections free,” we often provide no-cost assessments for local homeowners to ensure their safety.
How can I tell if a leak is from the roof or plumbing?
This is a common mystery! A roof leak typically follows the weather; if it only drips when it rains or snows, it’s the roof. If the drip is constant regardless of the weather, it’s likely plumbing. Also, check the location. If the stain is in the attic or on the top floor, and there are no bathrooms directly above it, the roof is the prime suspect. Roof leaks also tend to travel vertically or along rafters, whereas plumbing leaks might spread horizontally along a floorboard.
What tools do I need for a basic DIY inspection?
You don’t need a detective’s hat, but a few basics help:
- Binoculars: For seeing shingle detail from the safety of the sidewalk.
- Flashlight: For spotting water trails in the dark corners of your attic.
- Smartphone: To take photos of anything suspicious so you can show a professional.
- Notepad: To record the date and location of any stains you find.
Conclusion
A roof inspection for leaks isn’t just a chore; it’s an investment in your home’s future. By catching small issues today, you prevent the “ticking time bomb” of structural rot and mold from going off tomorrow. Whether you are doing a quick binocular check or heading into the attic with a flashlight, being proactive is the hallmark of a smart homeowner.
At Golini Roofing, we’ve spent over 35 years perfecting the art of the roof. Based right here in Wakefield, MA, we take pride in our “old-school” approach—we hand-nail every single shingle to ensure it stays put through the toughest Massachusetts winters. We serve our neighbors in Burlington, Woburn, Stoneham, and beyond with the same dedication to craftsmanship we’d use on our own homes.
If you’ve found a suspicious stain or just want peace of mind before the next big storm, don’t wait. Reach out to Jack Golini and our team today for a free roofing inspection. We’ll help you keep the rain outside where it belongs!